Friday, December 28, 2012

2012 Project Countdown

My good scrappy friend Stacey is hosting an informal blog hop of sorts at her blog, Oh Schwiet Scrap. Her idea was to list your 10 favorite layouts/projects you did in 2012. Here is a link to her list. Check it out--she is an amazing scrapper/artist! There are some great ideas and great links to tutorials all in one little top ten list! Stacey's challenge to all of us is to make a "Top 10 Favorite Projects of 2012" list of our own and share it with her in the comment section of her post. She will then compile all of the top 10 list links at the bottom of her original post and send out a RAK to one of the participants! Sounds like fun, right? So play along! Here is my list:

Top 10 Favorites of 2012

10. Rainbow Kit-this was made for a swap with a great group of ladies on scrapbook.com.


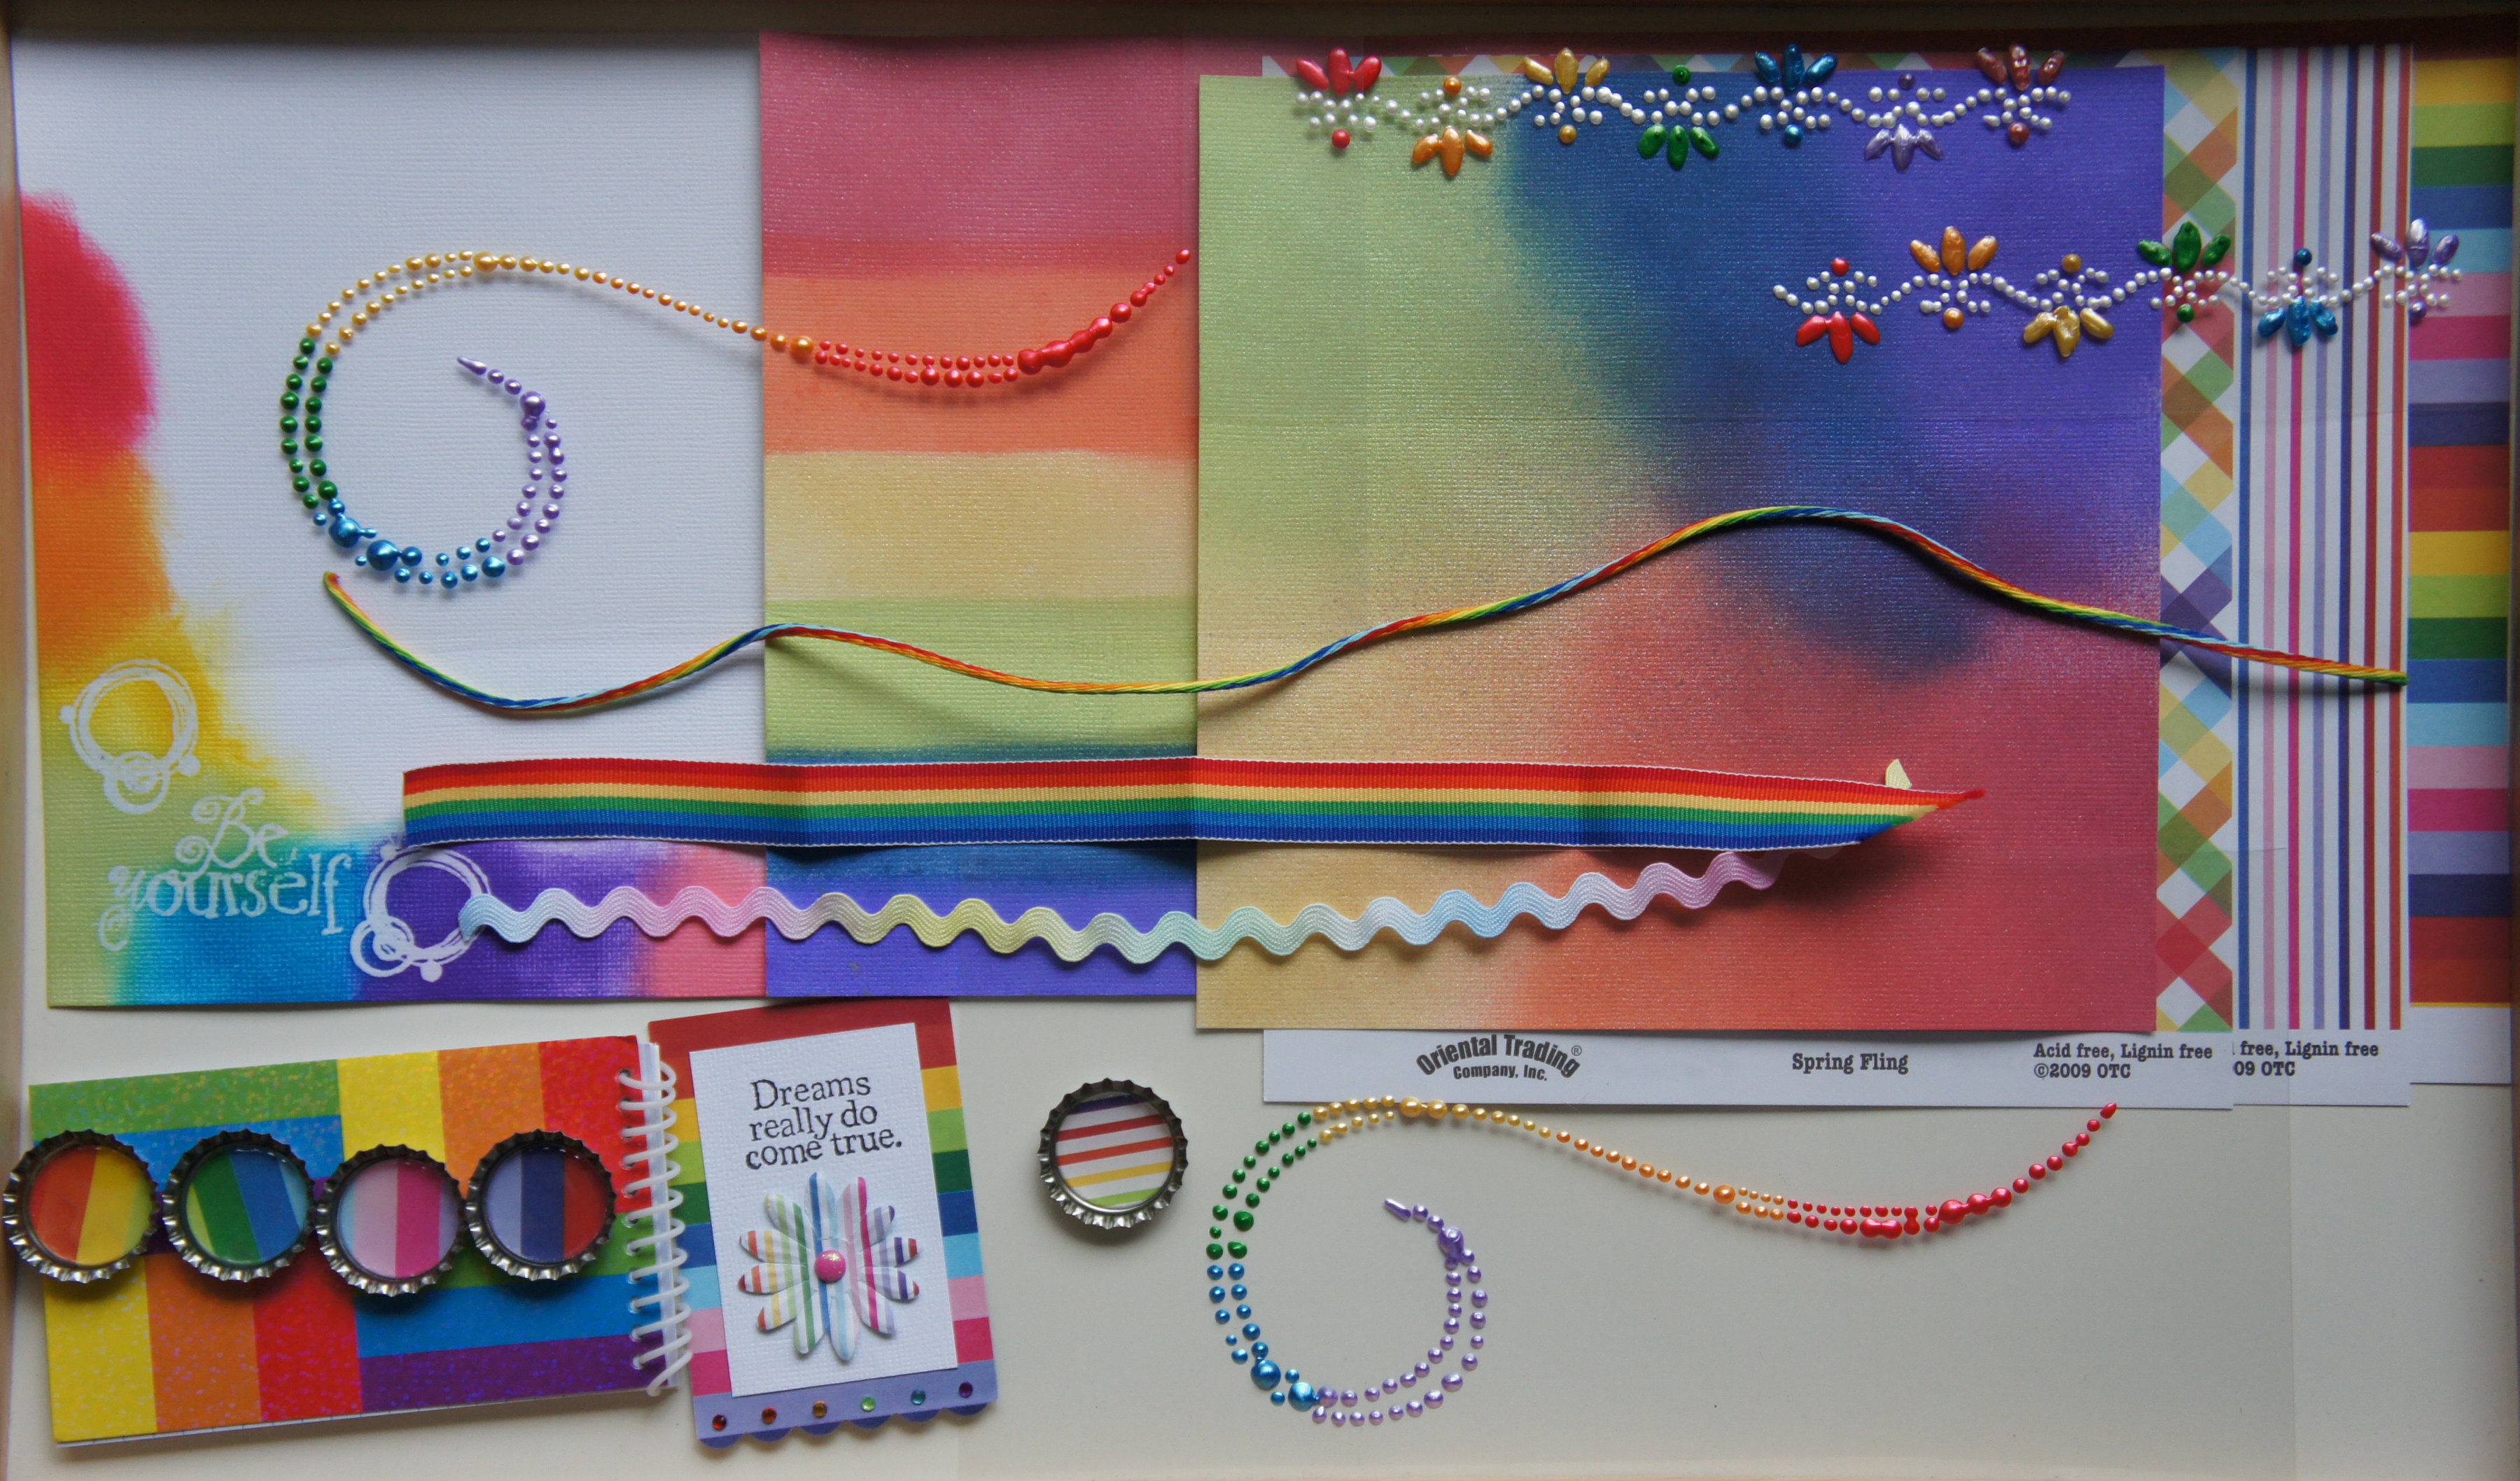
I handmade the 3 decorated sheets of cardstock, the 4 rainbow flourishes, the 5 bottle caps, and the "Dreams really do come true." tag. The paper all the way to the left was handmade using an ink resist embossing technique I was introduced to from this blog. The second and third papers from the left 
were made using Glimmer Mist by Tattered Angels. The flourishes were made using the technique found here. The bottle caps were made using store bought bottle caps by Bottle Caps, Inc. and 1 inch epoxy dots to cover the paper. I love rainbow and had too much fun making this kit!

9. this is some Good STUFF-A layout I made of my ex-girlfriend Kayla's niece Tera. I did some maternity shots for her in July 2012 and scrapped a few. 


8. aubrey lea-A layout of my ex-girlfriend's niece Tera's baby. I made this for the baby's baptism.It is very simple, but I really loved the picture and wanted that to be the focus.


7. FRIENDS-A layout of my ex-girlfriend's niece's wedding. I was working on a wedding scrap book as a wedding gift. 

I used the Scrap by Color tool on scrapbook.com to choose the color combo.

6. you're absolutely perfect-A layout of my ex-girlfriend's cousin's twins, Kourtlynn and Kinzie.


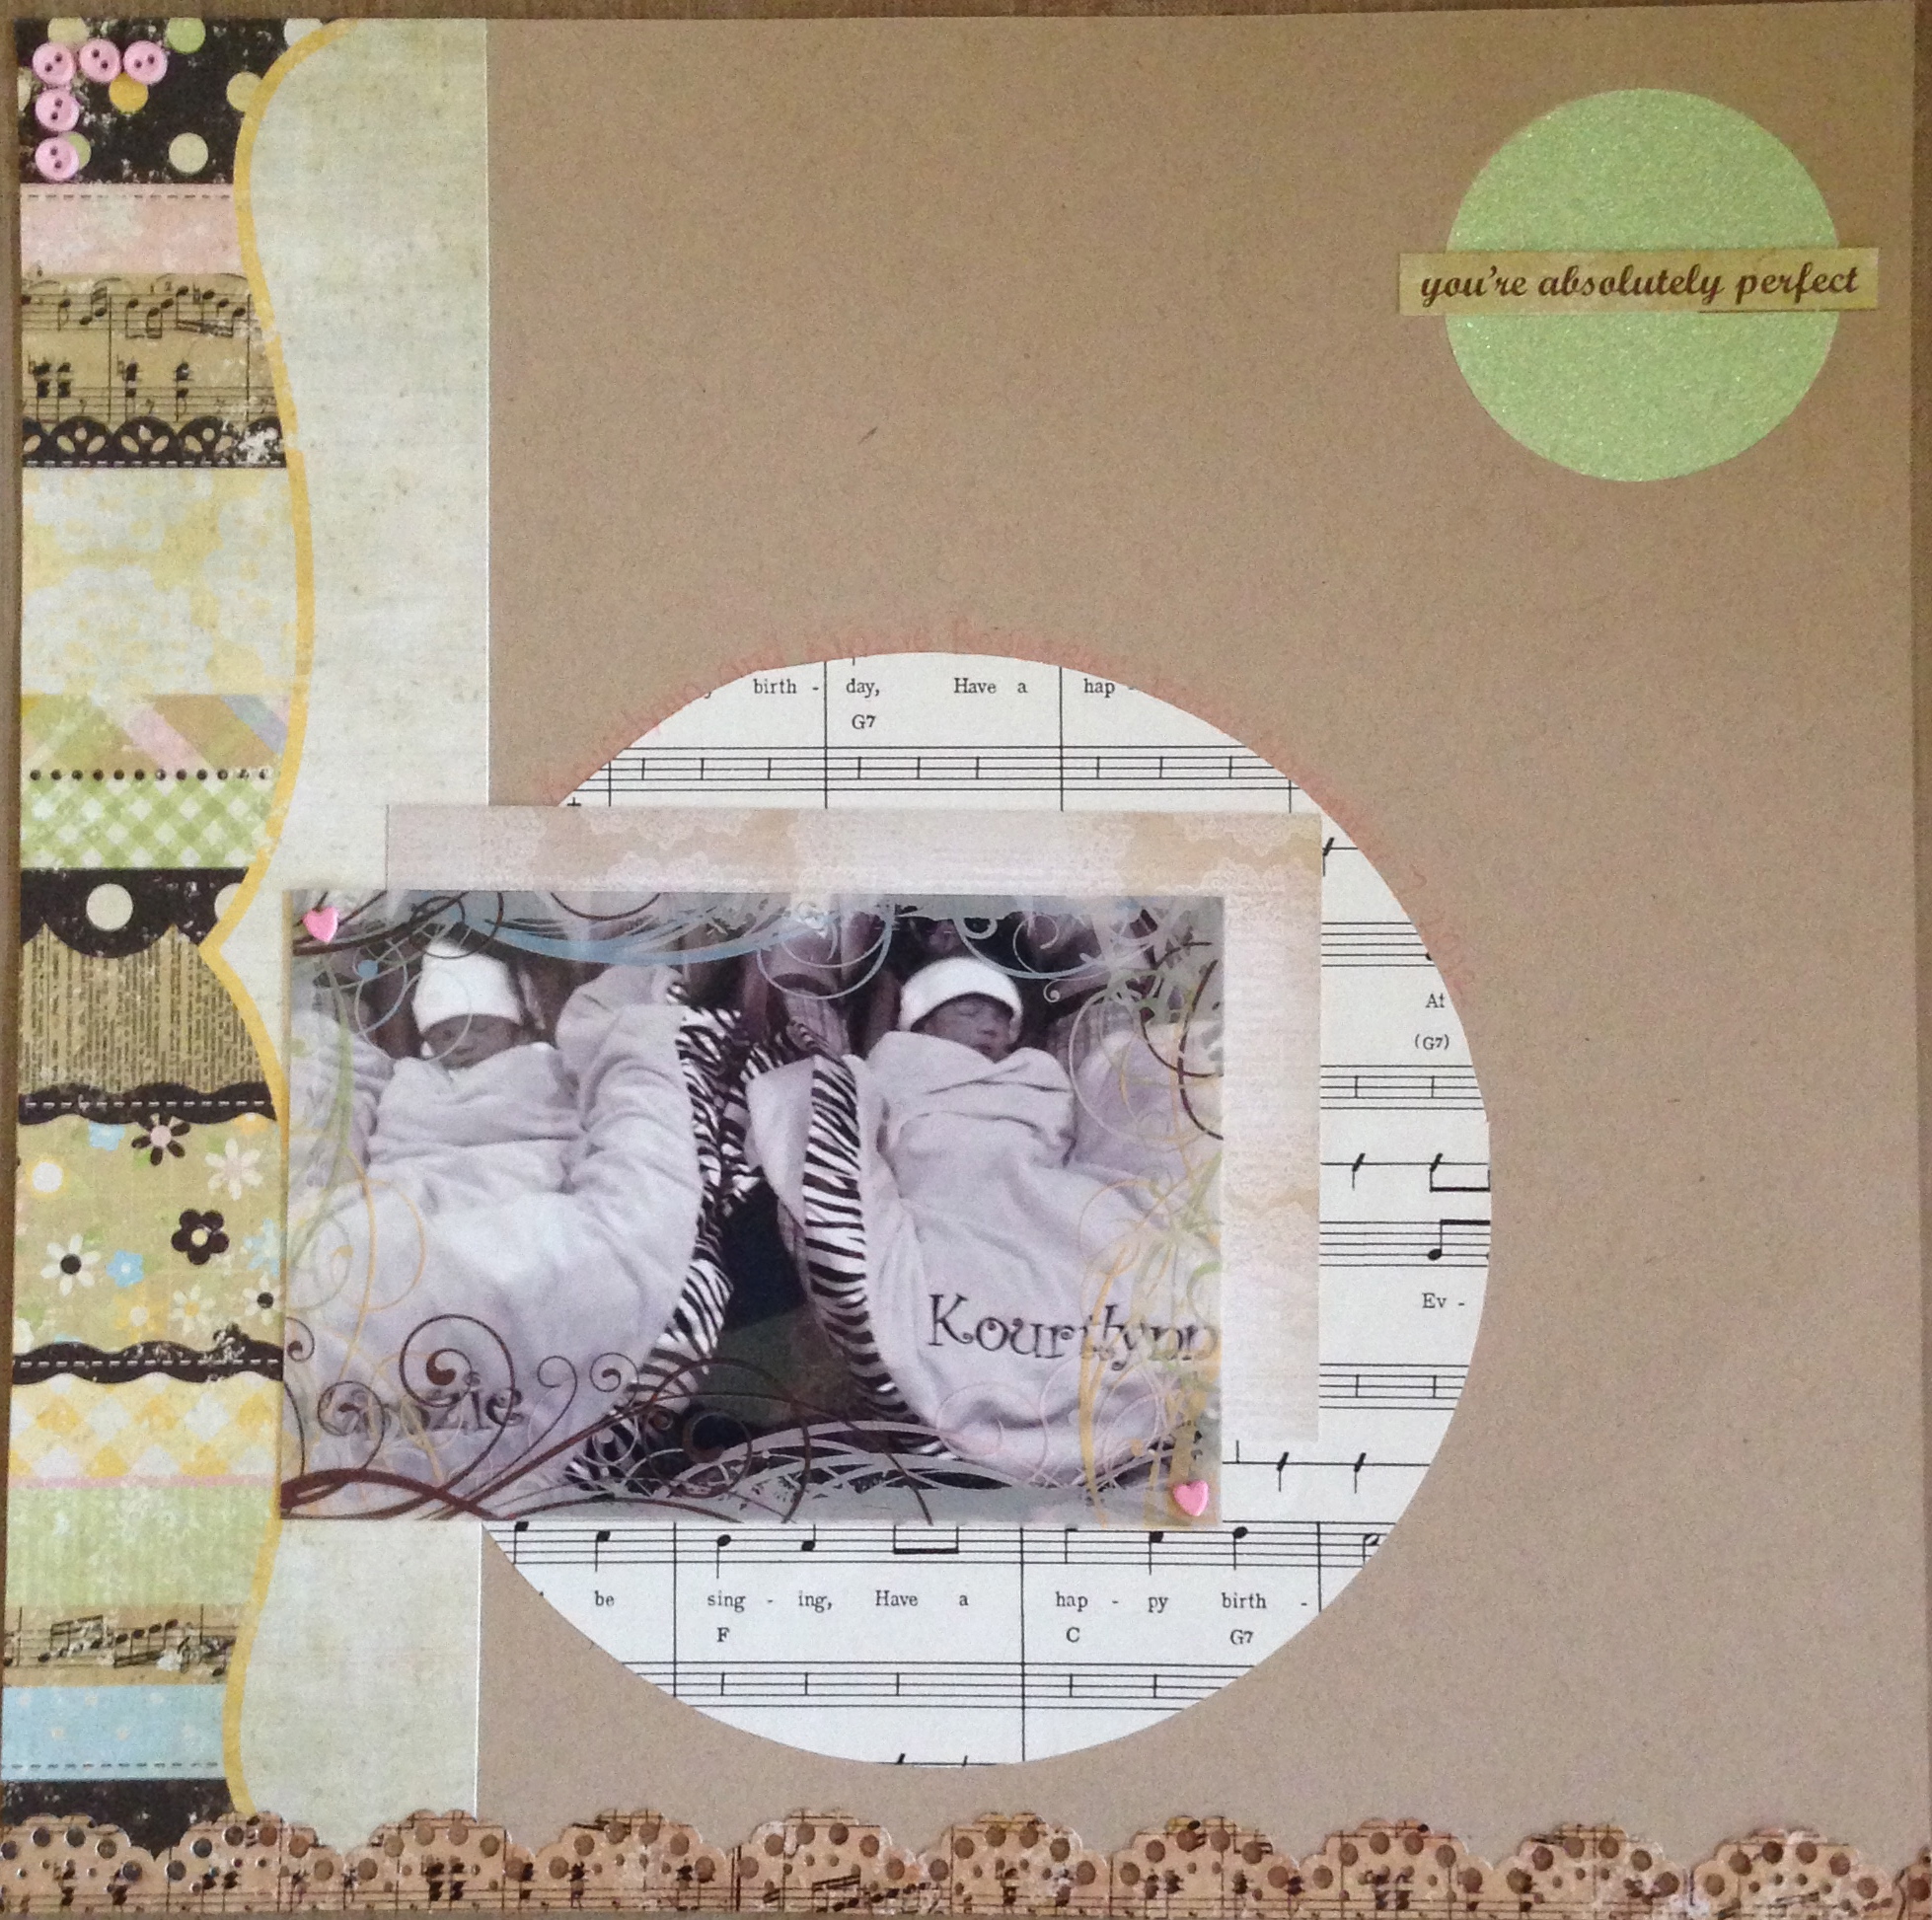
This layout is based on this sketch by Beggahuna.

5. memories-A layout of Kayla at The Supreme Court in Washington, D.C. on February 15, 2012.


4. BABY-Another layout of Kayla's niece, Tera's, maternity pictures.

3. birth|day|fun-A layout of my baby boy, Aslan's, 6th birthday. 

I found the tutorial for the glue dot bling (on the grid patterned paper) here. I do not care what this tutorial says--STICKLES DO NOT DRY QUICKLY! Especially when you put them on glue dots (I used Zots)! It took well over an hour, more like 2+ hours for these darn things to dry! I had to put them under a fan to speed up the process!

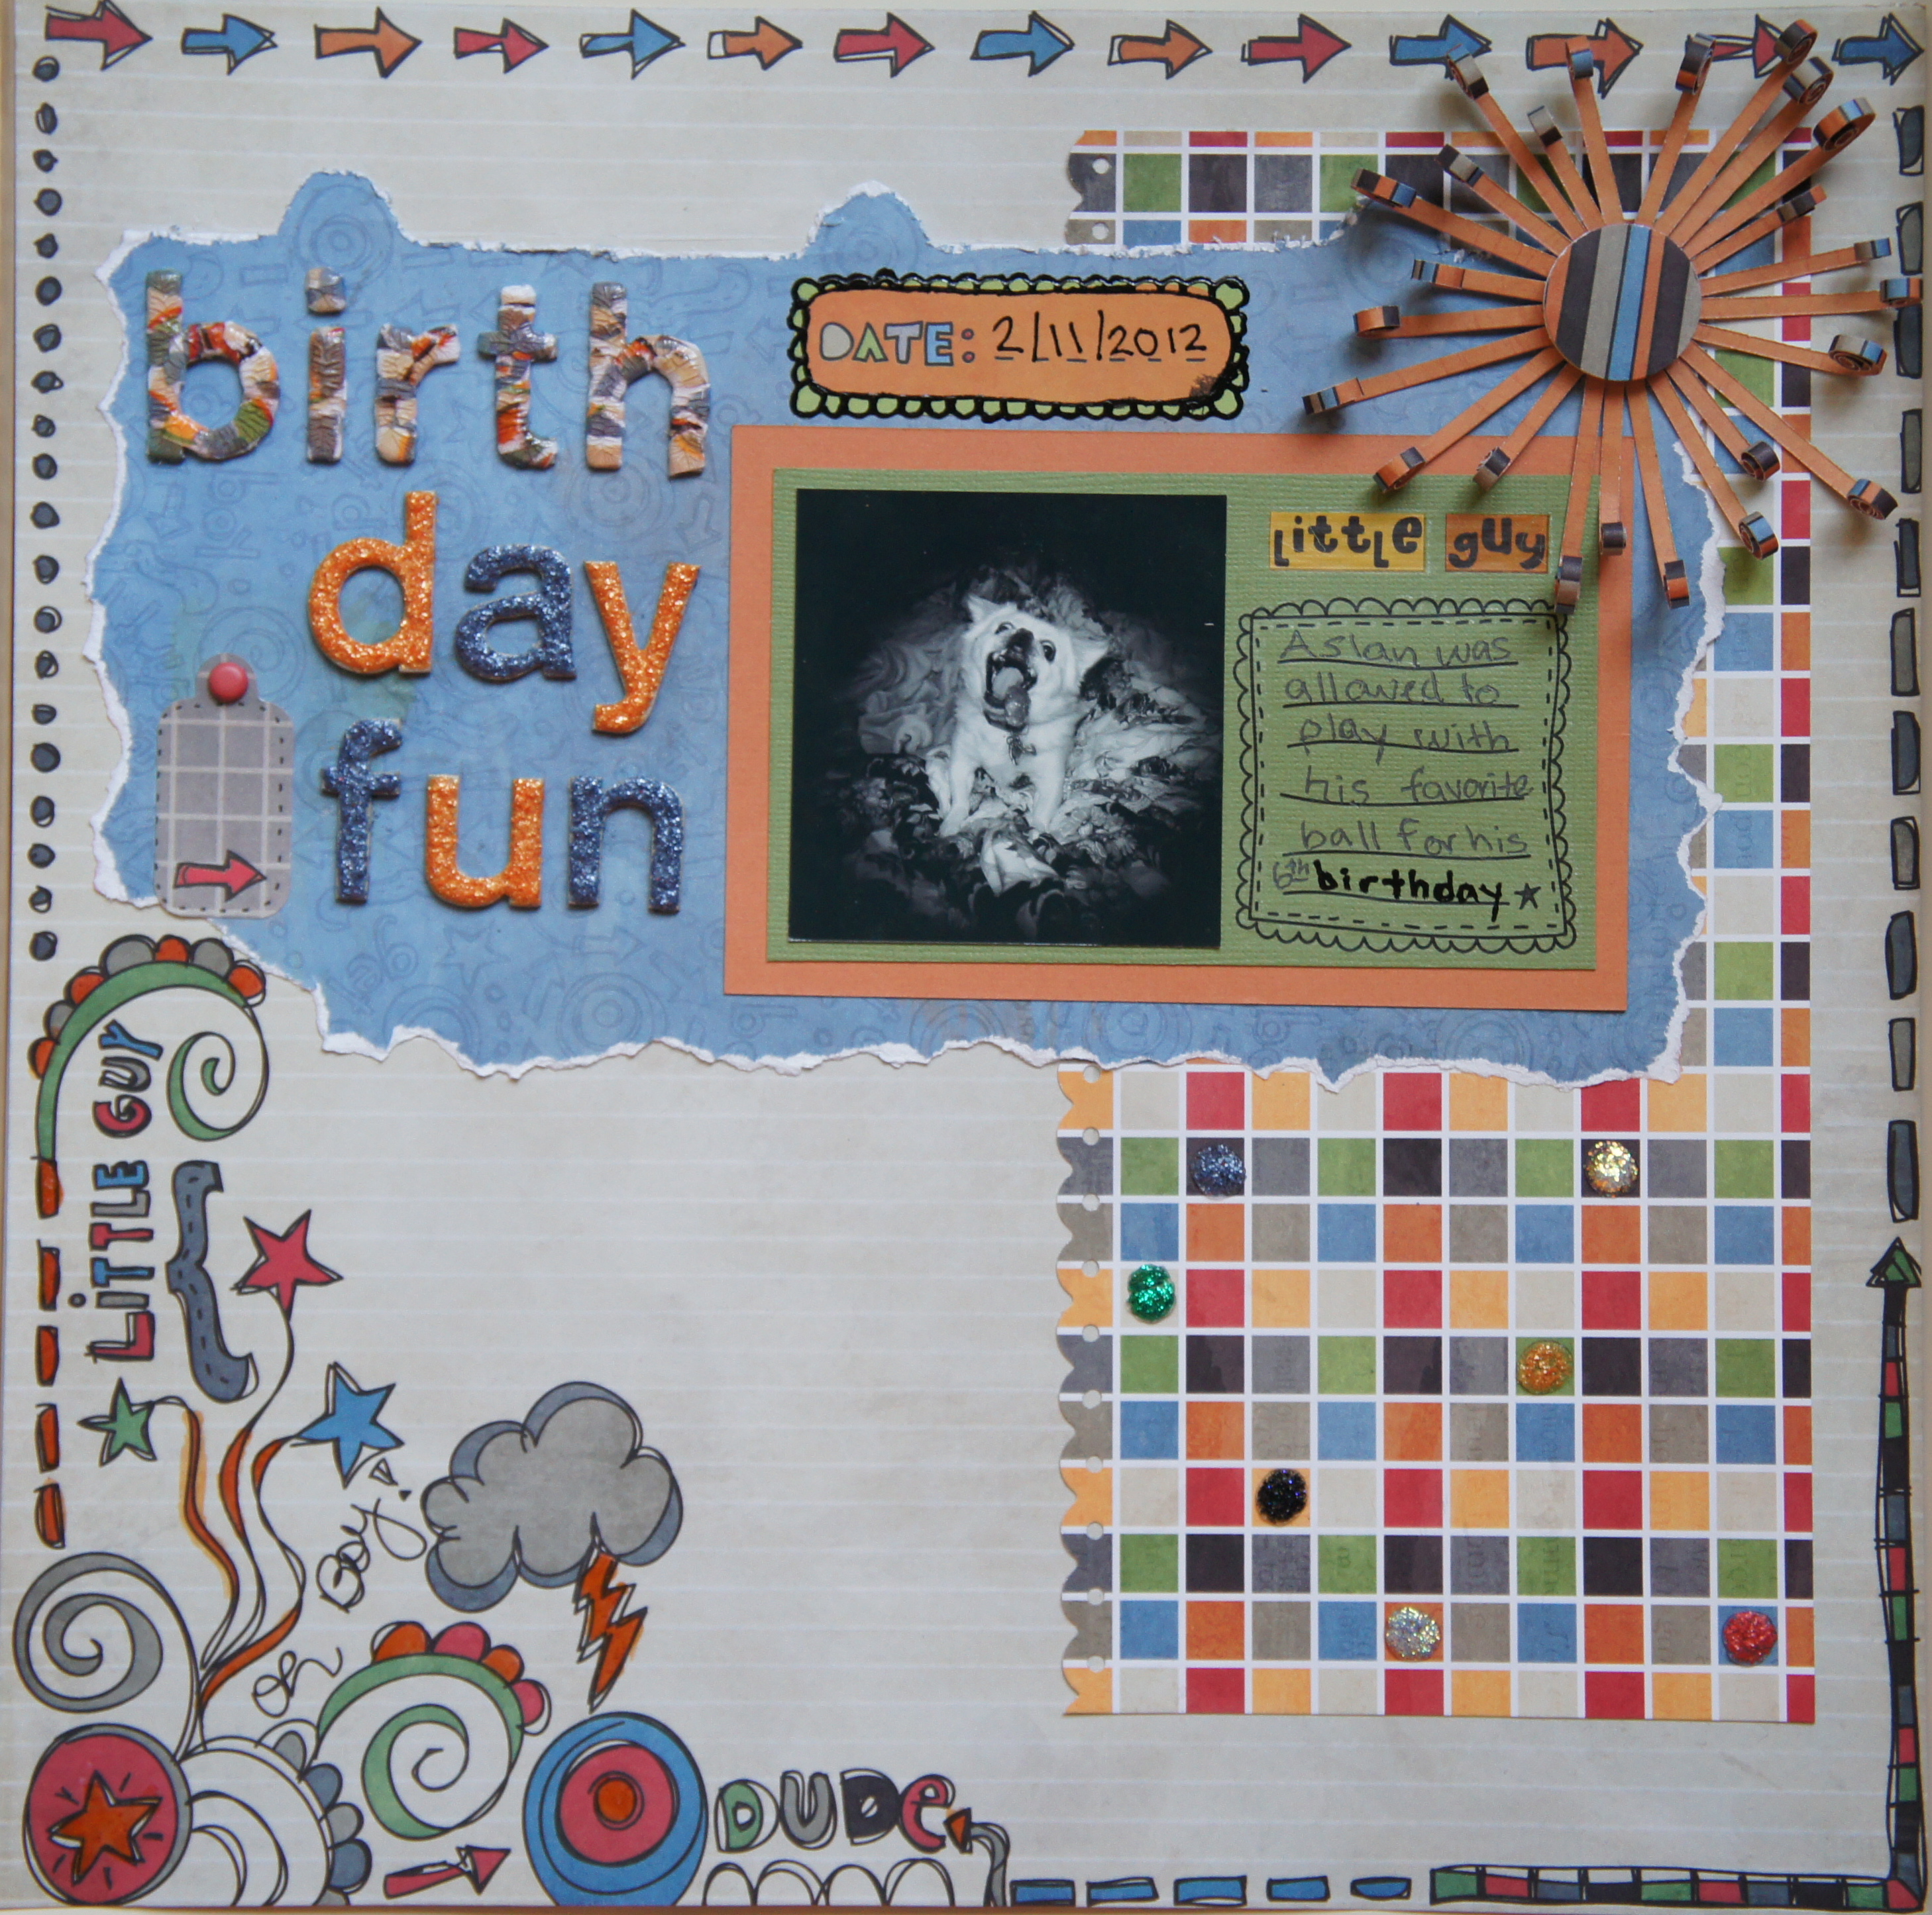
The tutorial for the chipboard letters "birth" I found here. I used patterned paper instead of newspaper, but the pp is harder to work with because of the thickness. It does not conform to the shape of the letters as easily.

The flower in the top right corner is my creation--no tutorial for it yet, but check out my blog in a few weeks and there should be one up then!


2. the RINGS-A layout of Tera and Jay's wedding in Pensacola Beach, FL in June 2012.
This layout is based on a sketch from Victoria Warren-Mears which can be found here.

1. Mardi Gras-This is a layout of Kayla and I at a Mardi Gras parade in Houma, LA in 2011. 

The Title/Journaling was made on wordle.net.

The border on the left was made using the resist embossing technique which is explained in this tutorial.

I made the mask based on one I received in a swap.

I also used beads I actually caught at the parade.

Thanks for checking me out!


Tuesday, December 18, 2012

Baptism Gift: Aubrey Lea

"Sometimes it's the smallest things that take up the most room in your heart." ~Winnie the Pooh

I made this framed layout for my girlfriend Kayla's niece's baby's baptism. It was a very simple LO, but I love the way it turned out. I actually was glad in the end that I resisted adding the multitude of embellishments I originally wanted to add--I think the simplicity really makes the LO more stunning and really allows the focus to be on the sweet baby girl, Aubrey Lea!


SUPPLIES USED:

  • Die Cuts With A View-12X12 Cardstock Stack-The Natural Stack
  • Simple Stories-Baby Steps Collection-12x12 Double Sided Paper-Page Elements
  • Simple Stories-Baby Steps Collection-12x12 Cardstock Stickers-Expressions
  • Simple Stories-Baby Steps Collection-12x12 Cardstock Stickers-Fundamentals
  • Scotch-Pink ATG Adhesive Applicator with 1/4" Adhesive
  • Black Album Cover Frame
  • PHOTO EDITING: Camera+ App for iPhone; effect: fashion
  • PHOTO CREDIT: Tera Robichaux (c) October 2012


Saturday, November 19, 2011

Authentique Paper Sketch Challenge: Trick or Treat 2011

I discovered the most AMAZING paper company today: Authentique! They have BEAUTIFUL papers & coordinating embellies and an amazing mission. They talk about their mission on their facebook page, saying they strive "to promote the belief [that] being genuine is the only way to live!" I LOVE that, so I had to check out their website, blog, and other paper collections. (I bought their Halloween collection, "Glowing," online.) Well, I was not disappointed! They have gorgeous papers!! I have fallen in love with their Journey collection too! I cannot wait to get it. You will certainly be seeing more creations from me using Authentique's beautiful, quality papers!

Also, they had a sketch challenge on their blog, which you can check out here. The challenge was to use the following sketch and Authentique products to make a layout.


This is the layout I made using Authentique Paper's Glowing collection and a picture of my ADORABLE nieces Mak and Gia in their Halloween costumes last month:


SUPPLIES USED: 
  • Authentique Paper: Glowing Collection "Music Notes" Paper
  • Authentique Paper: Glowing Collection "Black Script" Paper
  • Authentique Paper: Glowing Collection "Diction" Journaling Stickers
  • Authentique Paper: Glowing Collection "Headline 2" Titles
  • Authentique Paper: Glowing Collection "Excerpts" Quotes
  • Authentique Paper: Glowing Collection "Noteables" Die Cuts
  • Doodlebug Design: Doodle Twine "Halloween"
  • Bazzill Basics: In Stitch'z Border Stitching Template "Scallops"
  • Ranger: Vintage Ink "Licorice"
  • Scotch: Pink ATG Adhesive Applicator with 1/4" Adhesive
  • PHOTO EDITING: Camera+ App for iPhone; effect: black & white; border: light grit
  • PHOTO CREDIT: Steve Sadler (c) October 2011


Sunday, November 13, 2011

Scraplift: Chicks Dig Me!

I LOVE the scrapbooking style of an artist on scrapbook.com who goes by the name Martha B. (Check out her gallery here.) So when I was stuck for inspiration this week I went to her gallery and found this layout she did several years ago named "Chicks Dig Me" and decided to "scraplift" the layout as part of a "Progressive" challenge on scrapbook.com. 

scraplift-(v.) to use an artist's layout, concept, or design elements for inspiration

ORIGINAL LAYOUT: Chicks Dig Me by Martha B.
For the Progressive Challenge, a bunch of scrappers meet together on scrapbook.com at a designated day and time for a kind of virtual crop/challenge to complete a layout by following specified steps. It is a lot of fun and, unlike most real-life crops I've been to, I actually complete a page! If you want more information, check out the Progressive Headquarter's here. There will be another Progressive Challenge the Saturday after Thanksgiving, Saturday, November 26, 2011. We will be going live most likely at 9:00 AM EST (check the headquarters page for more accurate/up to date information)! So, join us on scrapbook.com in the forums section to play along! The link to the challenge thread will be posted on the Progressive Headquarter's page. 


HERE IS THE PAGE I ENDED UP MAKING on 11/11: 


SCRAPLIFTED LAYOUT: CHICKS DIG ME by Megan Ann Walker
STEPS FOLLOWED: 
  1. Design Step-Choose a scraplift: I choose Chicks Dig Me by Martha B. *above*
  2. Paper Step-border punch the edge of one of your papers
  3. Picture Step-add a frame to your picture
  4. Handmade Embellishment Step-I made my own page pebbles following this tutorial: How to Make Decorative Page Pebbles
  5. Other Embellishments Step-Add something round: I added brads.
  6. Title Step-Put your title on a journaling block.
  7. Doodle/Stitching/Journaling Step-Make a pocket on your page: The journaling block is attached on only 3 sides (open on top) creating a pocket that holds my tag with hidden journaling.

When I saw Martha B's layout (LO) I loved the title and the design. I wanted to use both the design, as well as the title, on my page, but I didn't know if I would have a picture that would work for this title. I had originally planned to use a picture of my dog, Aslan, or my nephew as a toddler. Then I found the picture I did use on my LO, and I knew it would work for this page. At that point, I realized if I was going with a Book of Me page, I wanted the page to have a tongue in cheek feel and to show the more sassy/spunky side of my personality. So I choose bright, bold colors and eye catching patterns. I tend to like pages that are not too busy, so I used fewer embellishments and colors than the original LO I was using for inspiration. In the end, while it is clear that Martha B's LO inspired mine, I feel like my LO is very different.

 Let me know what you think in the comments section below!


SUPPLIES USED
  • American Crafts-12x12 Cardstock Pack-60 Sheets-White
  • My Mind's Eye-Halloween Sparkles Cardstock Stack-Black Paper with White Glittered Circles
  • EK Success-Paper Shapers Edger Punch-Binding Edge
  • EK Success-Paper Shaper-Corner Rounder-Medium
  • Tattered Angels-Glimmer Mist-Turquoise Blue, Granite, Marshmallow, and Dazzling Diamonds
  • American Acrylic Paint-Citron Green
  • Foam Paint Brush
  • Lid from a RiteAid Pharmacy 13/16 dram Vial
  • K & Company-Citronella Collection Journal Pad
  • Making Memories-Clear Creations-Flourishes 4x6 Transparency Frame
  • Making Memories-Color-Staples-Light
  • Making Memories-Clear Epoxy Shapes-Circles
  • Regular Stapler
  • Large Black "Flowerz" Fabric Flower
  • Miscellaneous Teal/Green/Turquoise/White Fabric and Paper Flowers
  • Marvy Uchida-Circle Punch-1"
  • Doodlebug Design-Sugar Coated Brads-Halloween Assortment & Tuxedo Assortment
  • Scotch Pink ATG Adhesive Applicator Gun with 1/4" Adhesive
  • Glue Dots-Adhesive Dots-Craft
  • PICTURE EDITING: Camera+ App for iPhone; effect: Ansel; border: light grit
  • PHOTO CREDIT: N. Heller (c) December 2007

Wednesday, September 21, 2011

Welcome to My Blog!

Hi y'all! I am joining the blogging world to share my scrapbooking creations! Hopefully you will be inspired to create something yourself! Here's a little info about me:

A quote I love: "Some of it's magic, some of it's tragic, but I had a good life all the way." ~Jimmy Buffett


I'm a grad student at Duke University in Durham, NC studying Hebrew Bible and Judaic Studies in the Religion Department. I love being at Duke, amazing professors AND amazing students! 

I live with my 5 year old rescued Pekingese dog, Aslan, who is the only man I'll ever love and my girlfriend, Kayla.

I love to scrapbook! It is my passion! I love being creative and designing.

I am completely ADD and surprisingly (not!) unorganized and cluttered.